Program Organization and Separate Compilation
Contents
1.5. Program Organization and Separate Compilation#
So far, you have been writing code in a single file. However, as the code grows, it becomes challenging to read, harder to reuse, and more difficult to update and debug.
In the previous section, we discussed how to use functions to divide programs into smaller parts. Each function had a specific responsibility, and the main function called these functions to solve the problem.
By the same token, we want to split code across multiple files. This is with the goal of making the code easier to debug, reusable, and easier to collaborate on with many team members. We will also learn how splitting code into multiple files can make the compilation process faster.
1.5.1. How do we split code into separate files?#
1.5.1.1. Compilation of a single file#
For example, the following code is written in one file named main.cpp.
Code in main.cpp
#include <iostream>
using namespace std;

void printNum(int x);
int userInputNum();

int main(void) {
  int num = userInputNum();
  printNum(num);
  return 0;
}

void printNum(int x) {
  cout << "The number is " << x << endl;
}

int userInputNum() {
  int x;
  cout << "Enter a number: ";
  cin >> x;
  return x;
}
If we want to run the program, we need to compile the code. Compilation is the process of translating the human-readable code into binary instructions that the computer can execute directly or machine code. The compiler reads the code and translates it into machine code stored in a file called the executable file. The executable file is then executed by the computer.
To compile the code above, we will use the C++ compiler named g++. We will navigate to the directory containing main.cpp and run the following command in the terminal:
g++ main.cpp -o main
g++ is the compiler that will read the source code file main.cpp. We use the flag -o to specify the name of the executable file main that will be created after the compilation process. The executable file is the file that contains the machine code that the computer can execute. We can run the executable file by running the following command:
./main
The program will ask you to enter a number, and then it will print the number you entered.
1.5.1.2. Split code into multiple files#
Generally, we separate the interface, which is the function declarations, from the implementation, which is the function definitions. The interface is stored in a header file with the extension .h, and the implementation is stored in a source file with the extension .cpp.
We can indeed have all function declarations in a header file .h and all function definitions in a source file .cpp. However, to separate the code into logical splits, we will have each header file responsible for a particular set of functions and each source file responsible for the implementation of the functions in the header file.
For example, we will split the code above into two header files: print.h and input.h, and three source files: print.cpp, input.cpp and main.cpp.
These files contain:
print.h: the function declaration ofprintNumfunction.input.h: the function declaration ofuserInputNumfunction.print.cpp: the function definition for theprintNumfunction.input.cpp: the function definition for theuserInputNumfunction.main.cpp: themainfunction.
Code split in the files will look like the following:
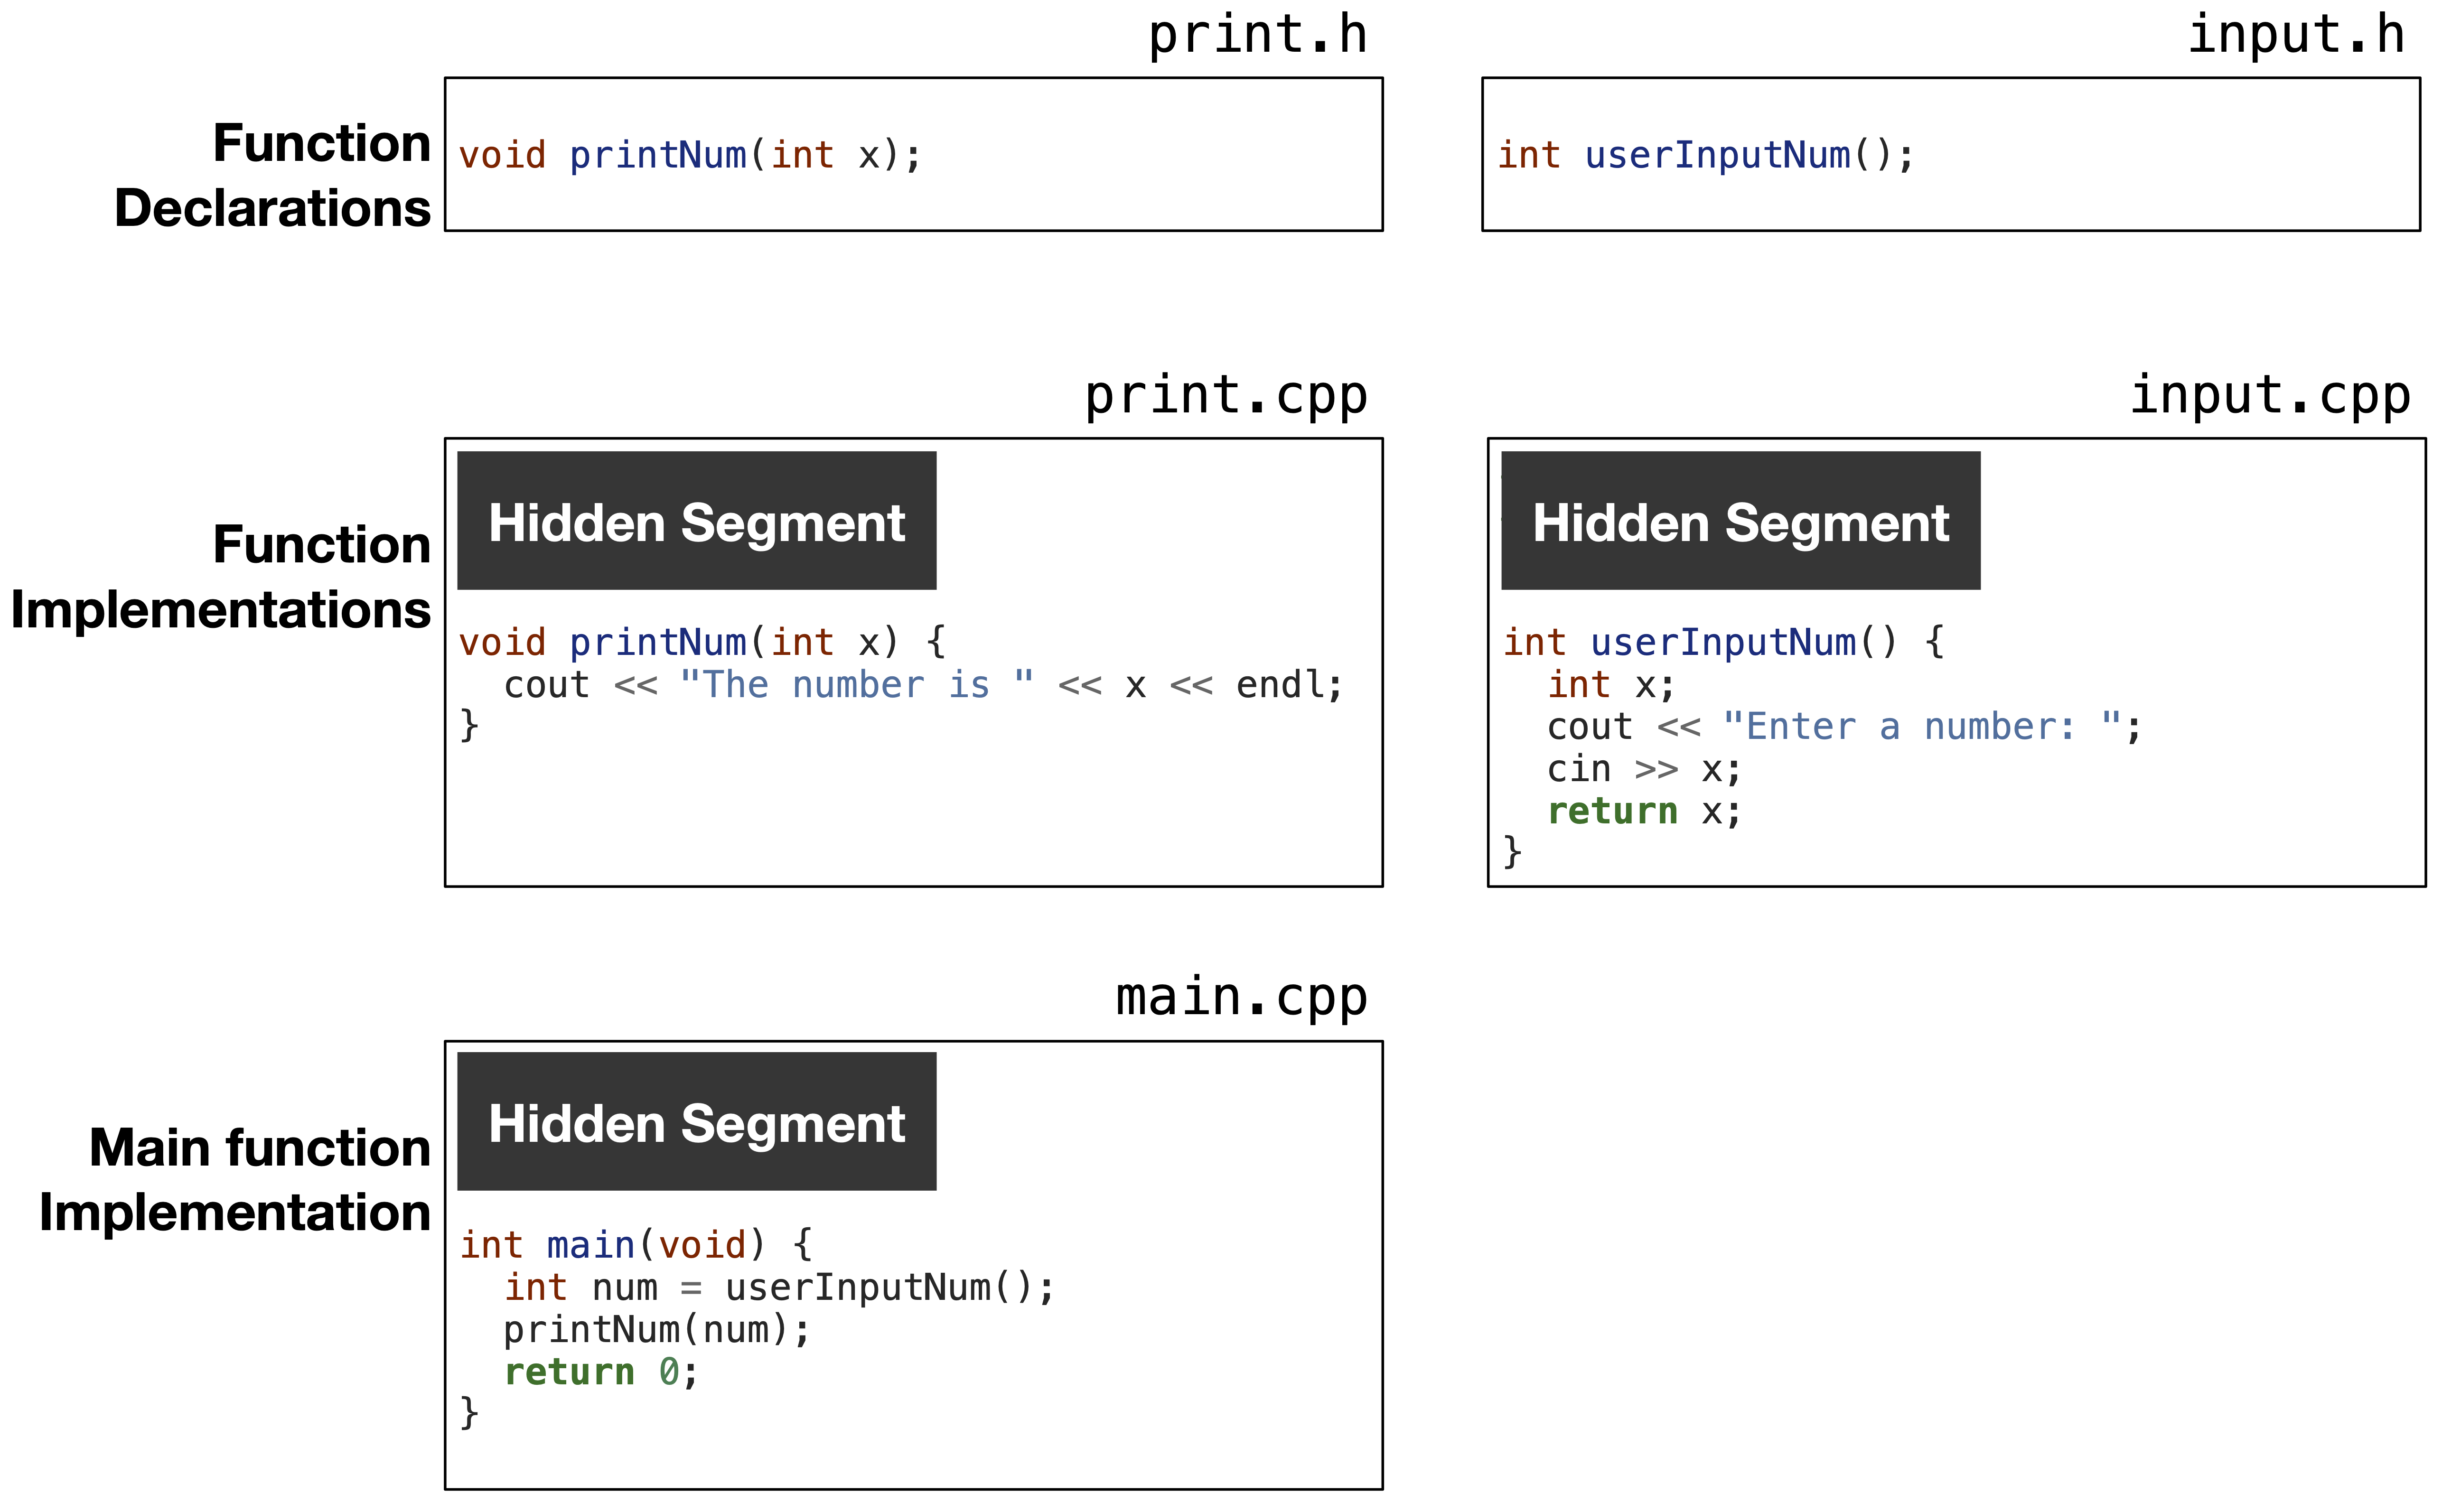
Fig. 1.13 The header files contain function declarations, and the source files contain function definitions. Hidden segments in the source files are the function declarations of functions used in the source file.#
As shown in Fig. 1.13, the source files contain “hidden segments”. These hidden segments should be function declarations of functions used in the source file. Each source file should be “self-sufficient”, meaning each source file should contain all the function declarations needed to compile the code. For example, the main.cpp file uses the printNum and userInputNum functions, which are not declared before usage in the main function. The main.cpp file should contain the function definitions for these functions.
In main.cpp, we will have the function definition of printNum as #include "print.h" and userInputNum as #include "input.h" in the main.cpp file.
In print.cpp, we will have the function definition of printNum function as #include "print.h". Since we use the cout object in the printNum function, we need to include the iostream library and add using namespace std; in the print.cpp file.
In input.cpp, we will have the function definition of userInputNum function as #include "input.h". Since we use the cout and cin object in the userInputNum function, we need to include the iostream library and add using namespace std; in the input.cpp file.
After including all function declarations in all source files, the code in the files will look like the following:
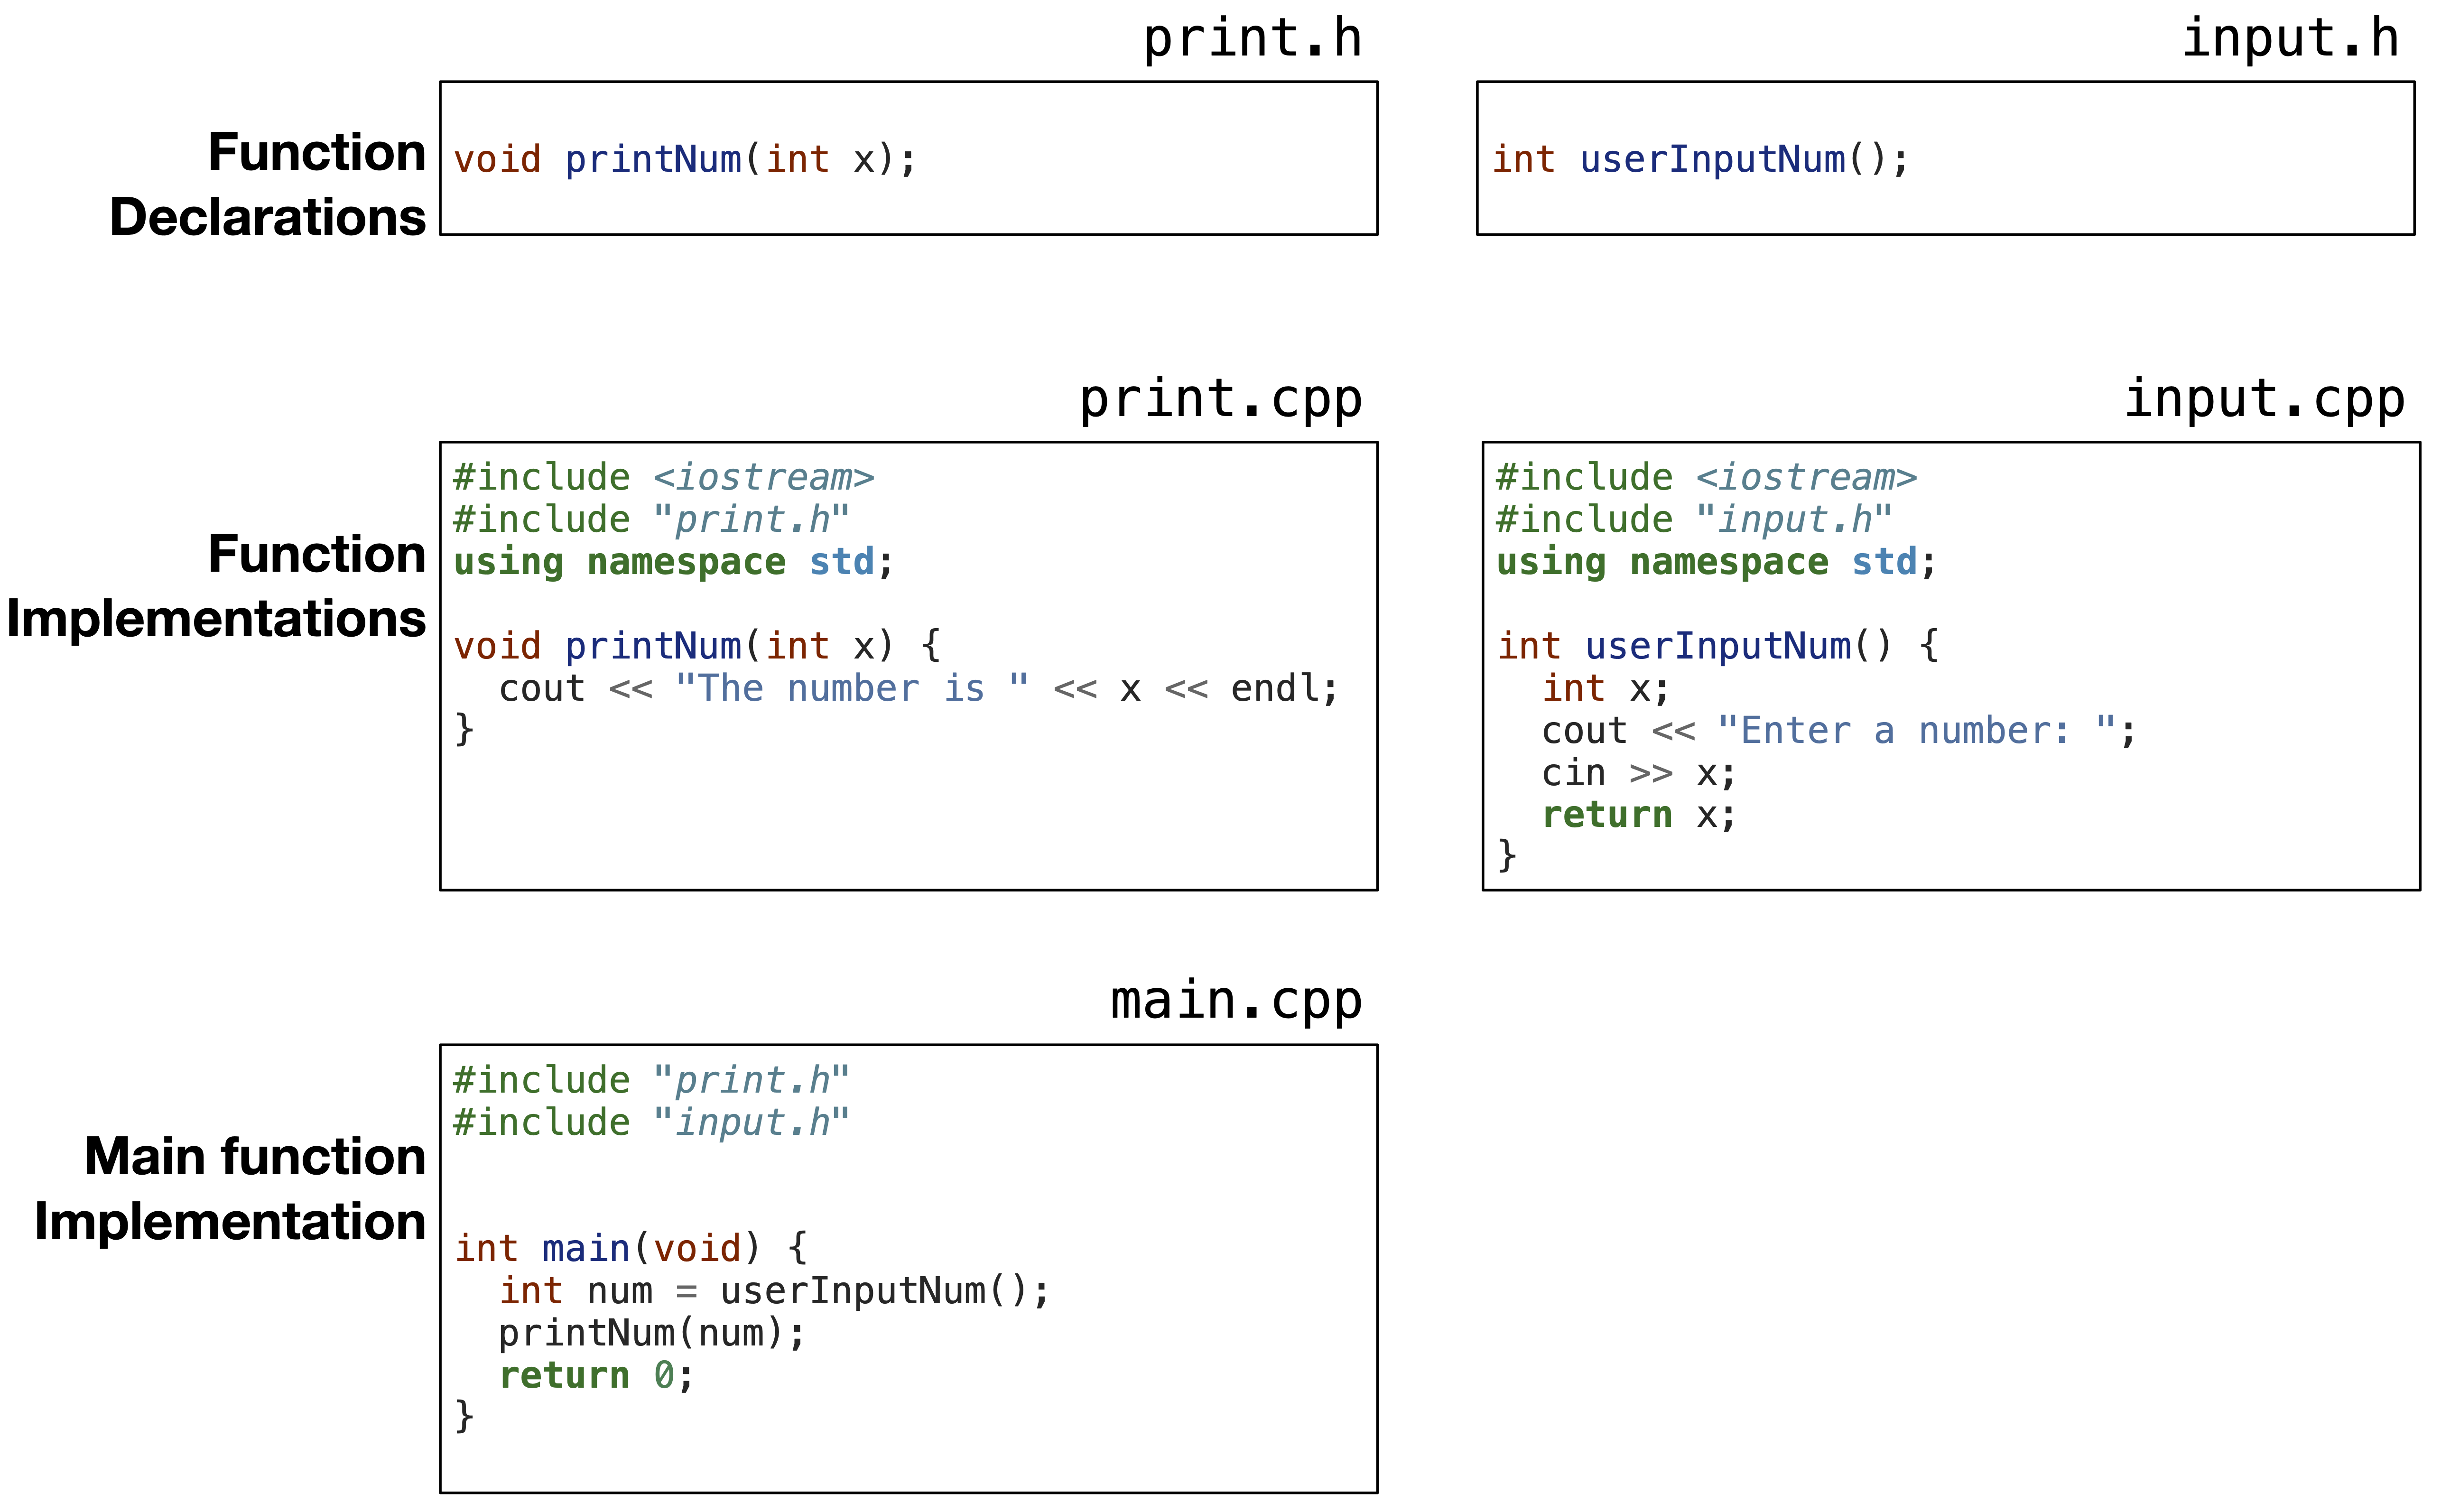
Fig. 1.14 Source files include the function declarations from header files to be ready for compilation.#
1.5.2. How are multiple files compiled?#
To compile a program with multiple files, we can go to the directory having all the files and run the following command:
g++ main.cpp print.cpp input.cpp -o main
This command will compile each source file separately, and generate one executable file named main.
What are the steps that generate one executable?
To generate the executable file, the g++ compiler goes through the following steps:
1- Preprocessing: The preprocessing step textually replaces #include "file_name" in each source file with contents of the file_name. After that step, we don’t need the header files anymore.
2- Generating object files: The compiler converts each preprocessed human-readable code to machine code and stores it in an object file. For example, main.cpp will be converted to main.o file. The object file contains the machine code for the functions defined in the source file, and references to other files. For example, the main.o file will contain the machine code for the main function and references to the printNum and userInputNum functions. Hence, the object file cannot be executed by the computer alone.
3- Linking object files: The linker will link all object files together to generate one executable file. The executable file contains the machine code for all functions defined in all source files. The linking step is much faster than the compilation step.
The preprocessing and compilation steps are done for each source file separately through the following commands:
1- Main.cpp: g++ -c main.cpp produces main.o.
2- Print.cpp: g++ -c print.cpp produces print.o.
3- Input.cpp: g++ -c input.cpp produces input.o.
The linking step is done once for all object files using the command:
g++ main.o print.o input.o -o main
In Fig. 1.15, we show the process of generating an executable file from multiple source files.
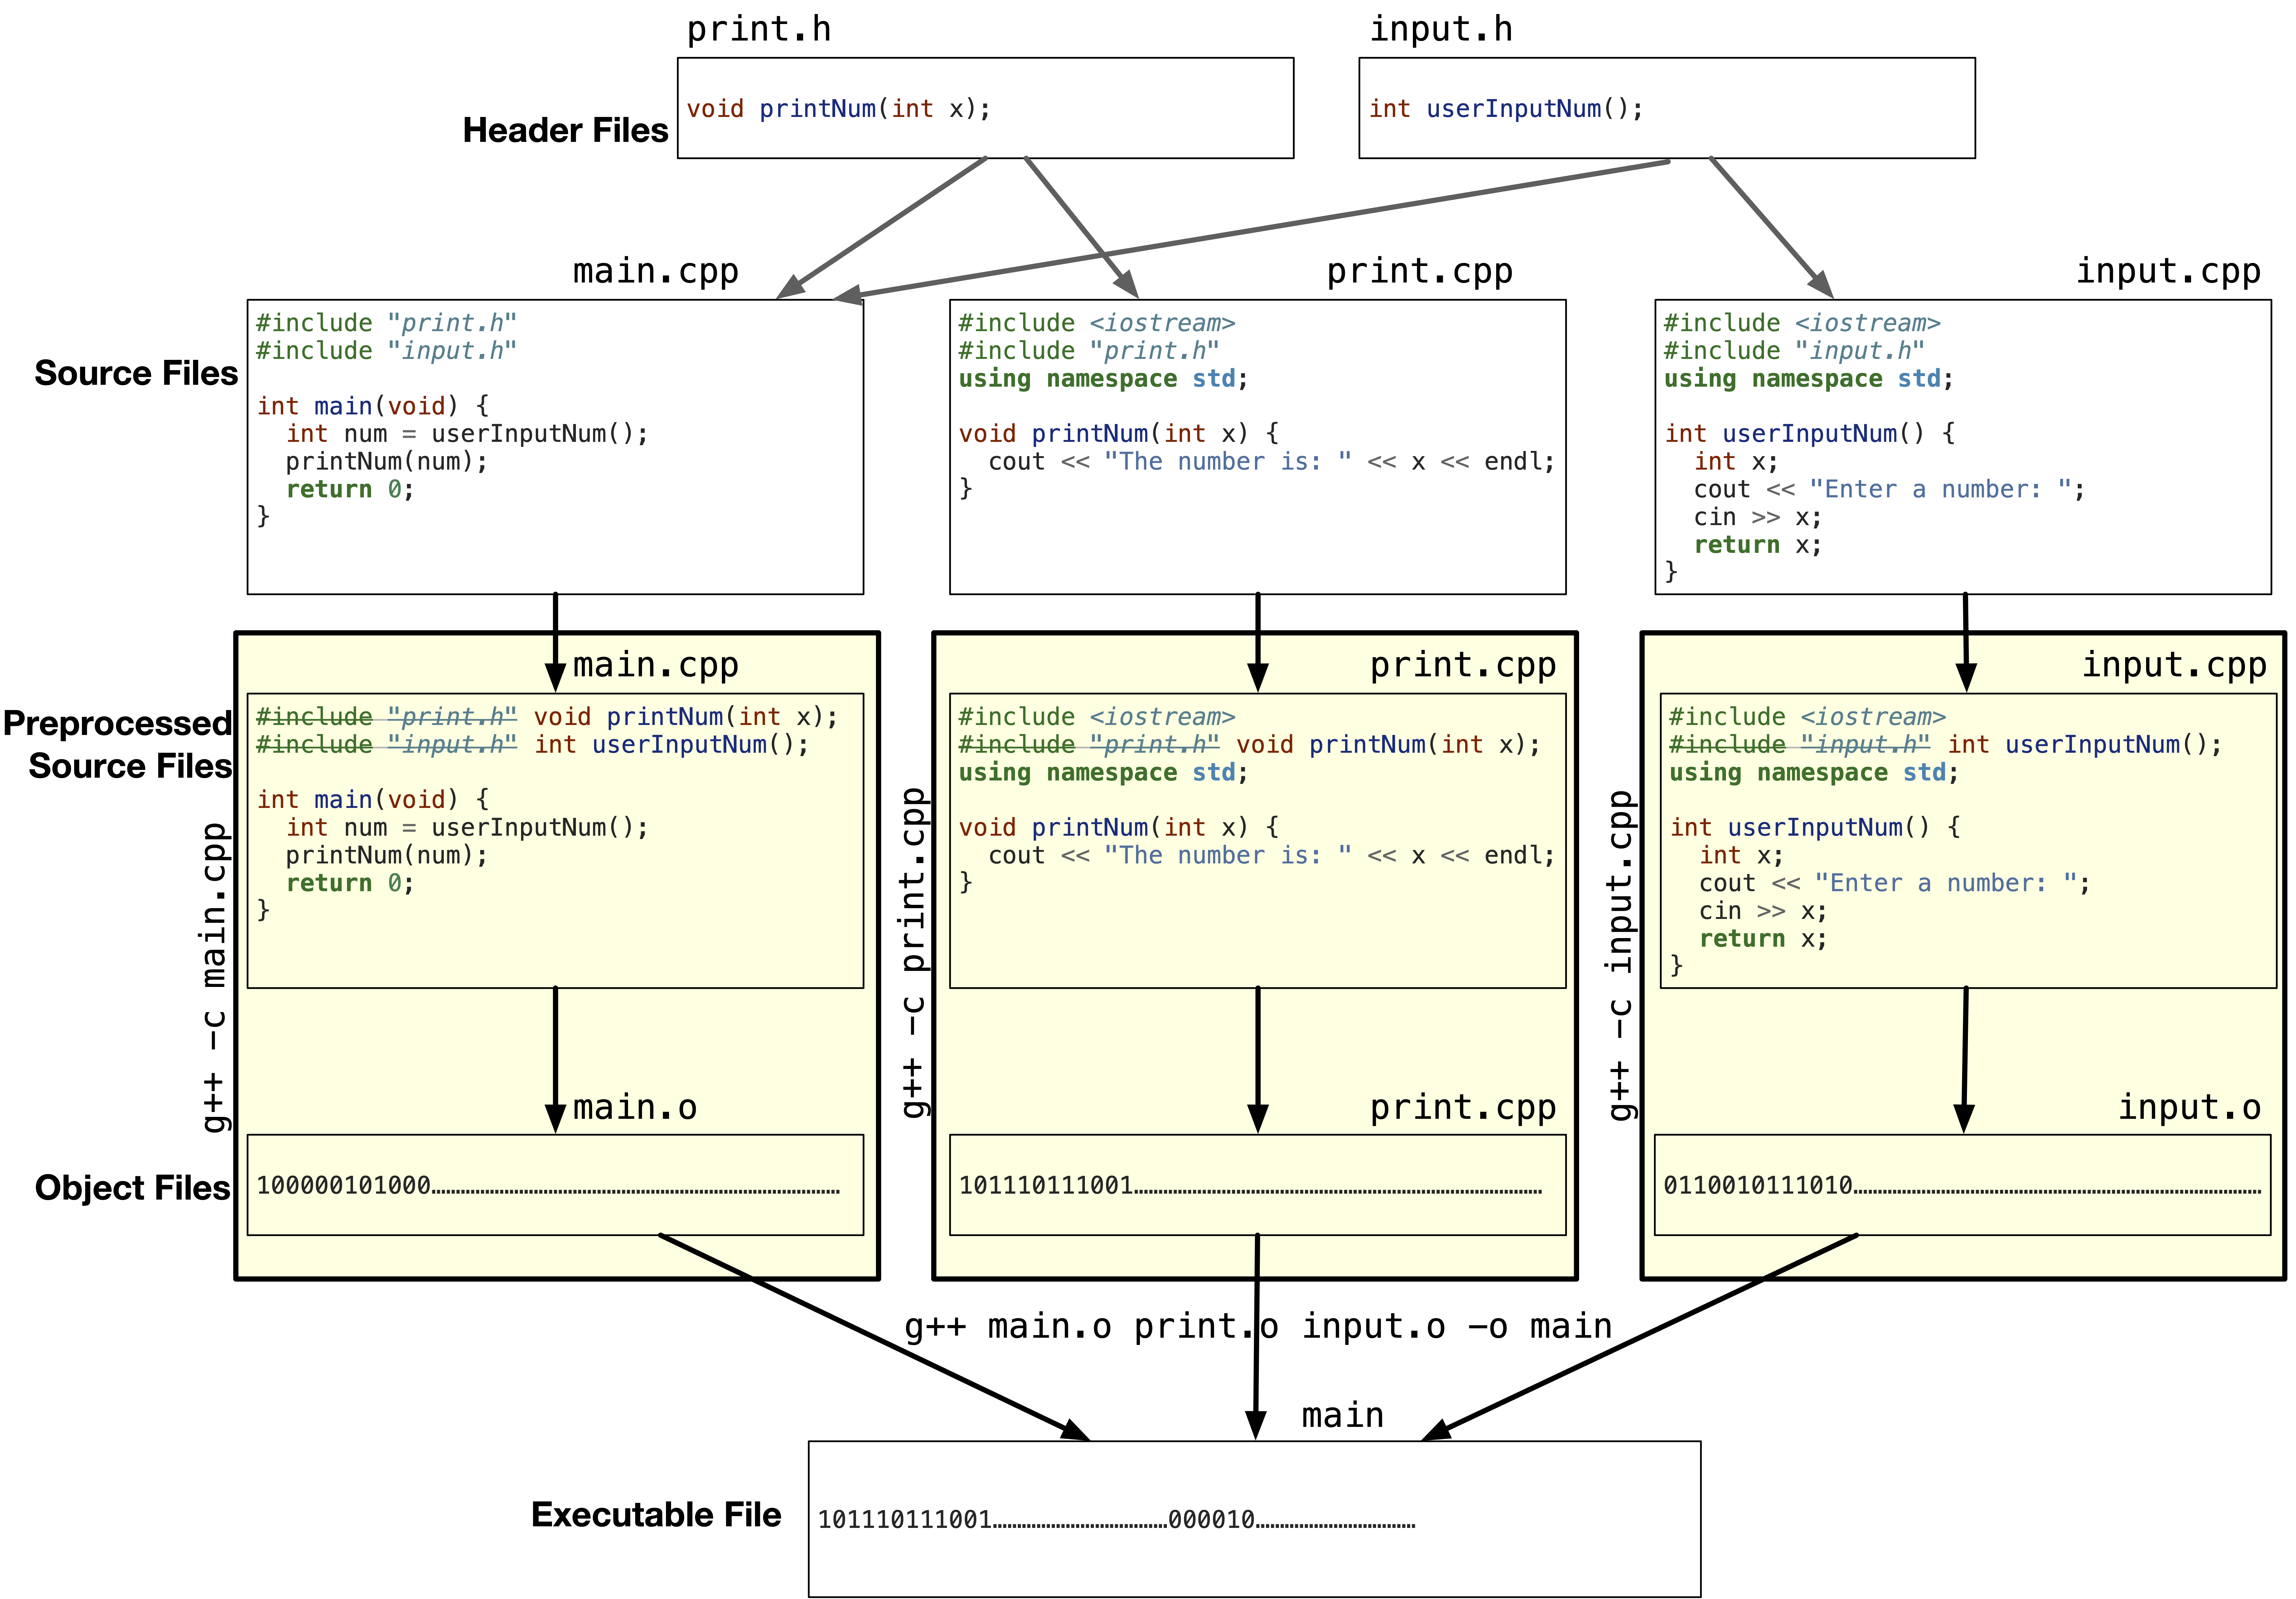
Fig. 1.15 The process of generating an executable file from multiple source files.#
1.5.2.1. Separate Compilation#
The process of compiling each source file separately and linking them together is called separate compilation. Separate compilation allows us to compile only the source files that have been changed. This makes the compilation process faster.
In the above example, if we change the
print.cppfile, this changes the machine code in theprint.ofile. To generate the new executable file, we only need to compile theprint.cppfile and link it with the other object files. We don’t need to compile themain.cppandinput.cppfiles. This requires running the following commands:g++ -c print.cppg++ main.o print.o input.o -o main
main.cpp, we only need to compilemain.cppand link themain.ofile with the other object files using:g++ -c main.cppg++ main.o print.o input.o -o main
print.hfile, any source file that includes it must be recompiled. This is because, during the preprocessing stage,#include "print.h"is replaced with the updated contents of the file. Recompiling ensures that source files using the updated declarations generate the correct object files. This requires running the following commands:g++ -c print.cppg++ -c main.cppg++ main.o print.o input.o -o main
The order of compiling the source files does not matter as long as all source files are compiled before linking them together.
Since linking is much faster than compilation, we will only compile files that need to be recompiled and. Separate compilation is a powerful feature that allows us to compile only the source files that have been changed. This makes the compilation process faster and more efficient. IDEs, like VS Code, and build tools, like Make, automate the process of separate compilation by tracking files changed and compiling only the necessary source files.
1.5.3. Why do we need header files?#
Header files used to store function declarations are included in the source files using the #include "file_name" directive. The header files are not compiled separately, but their contents are copied to the source files during the preprocessing stage.
Let’s copy function declarations. If we were to get rid of header files and include the function declarations in the source files, we would have to copy the function declarations to all source files that use the functions. This would lead to code duplication and make the code harder to maintain.
Let’s include source files. If we were to include source files instead of the header files:
whenever we change a source file, we have to compile it and any other file that includes it. For example, if we have
#include "print.cpp"in themain.cppfile, we have to compileprint.cppandmain.cppwhenever we changeprint.cpp. This defeats the purpose of separate compilation that saves time by compiling only the source files that have been changed.the linker will fail at generating an executable as it will detect that there are duplicate function implementations in multiple object files. For example, if we have
#include "print.cpp"in themain.cppfile, theprintNumfunction will be defined in bothprint.oandmain.ofiles. The linker will detect this and fail to generate an executable file.
1.5.4. What happens if we include a header file multiple times?#
Why would someone mistakenly include a header file multiple times? The answer is that a header file may include another header file, and then you include both these header files in a source file. For example, the following figure shows a.h and b.h header files. The b.h header file includes the a.h header file to be able to use struct A in b.h. If you include both a.h and b.h in a source file, at the preprocessing stage, the a.h file contents, which is struct A definition will be included twice in the source file. This flags an error at compilation as the struct A definition is duplicated.
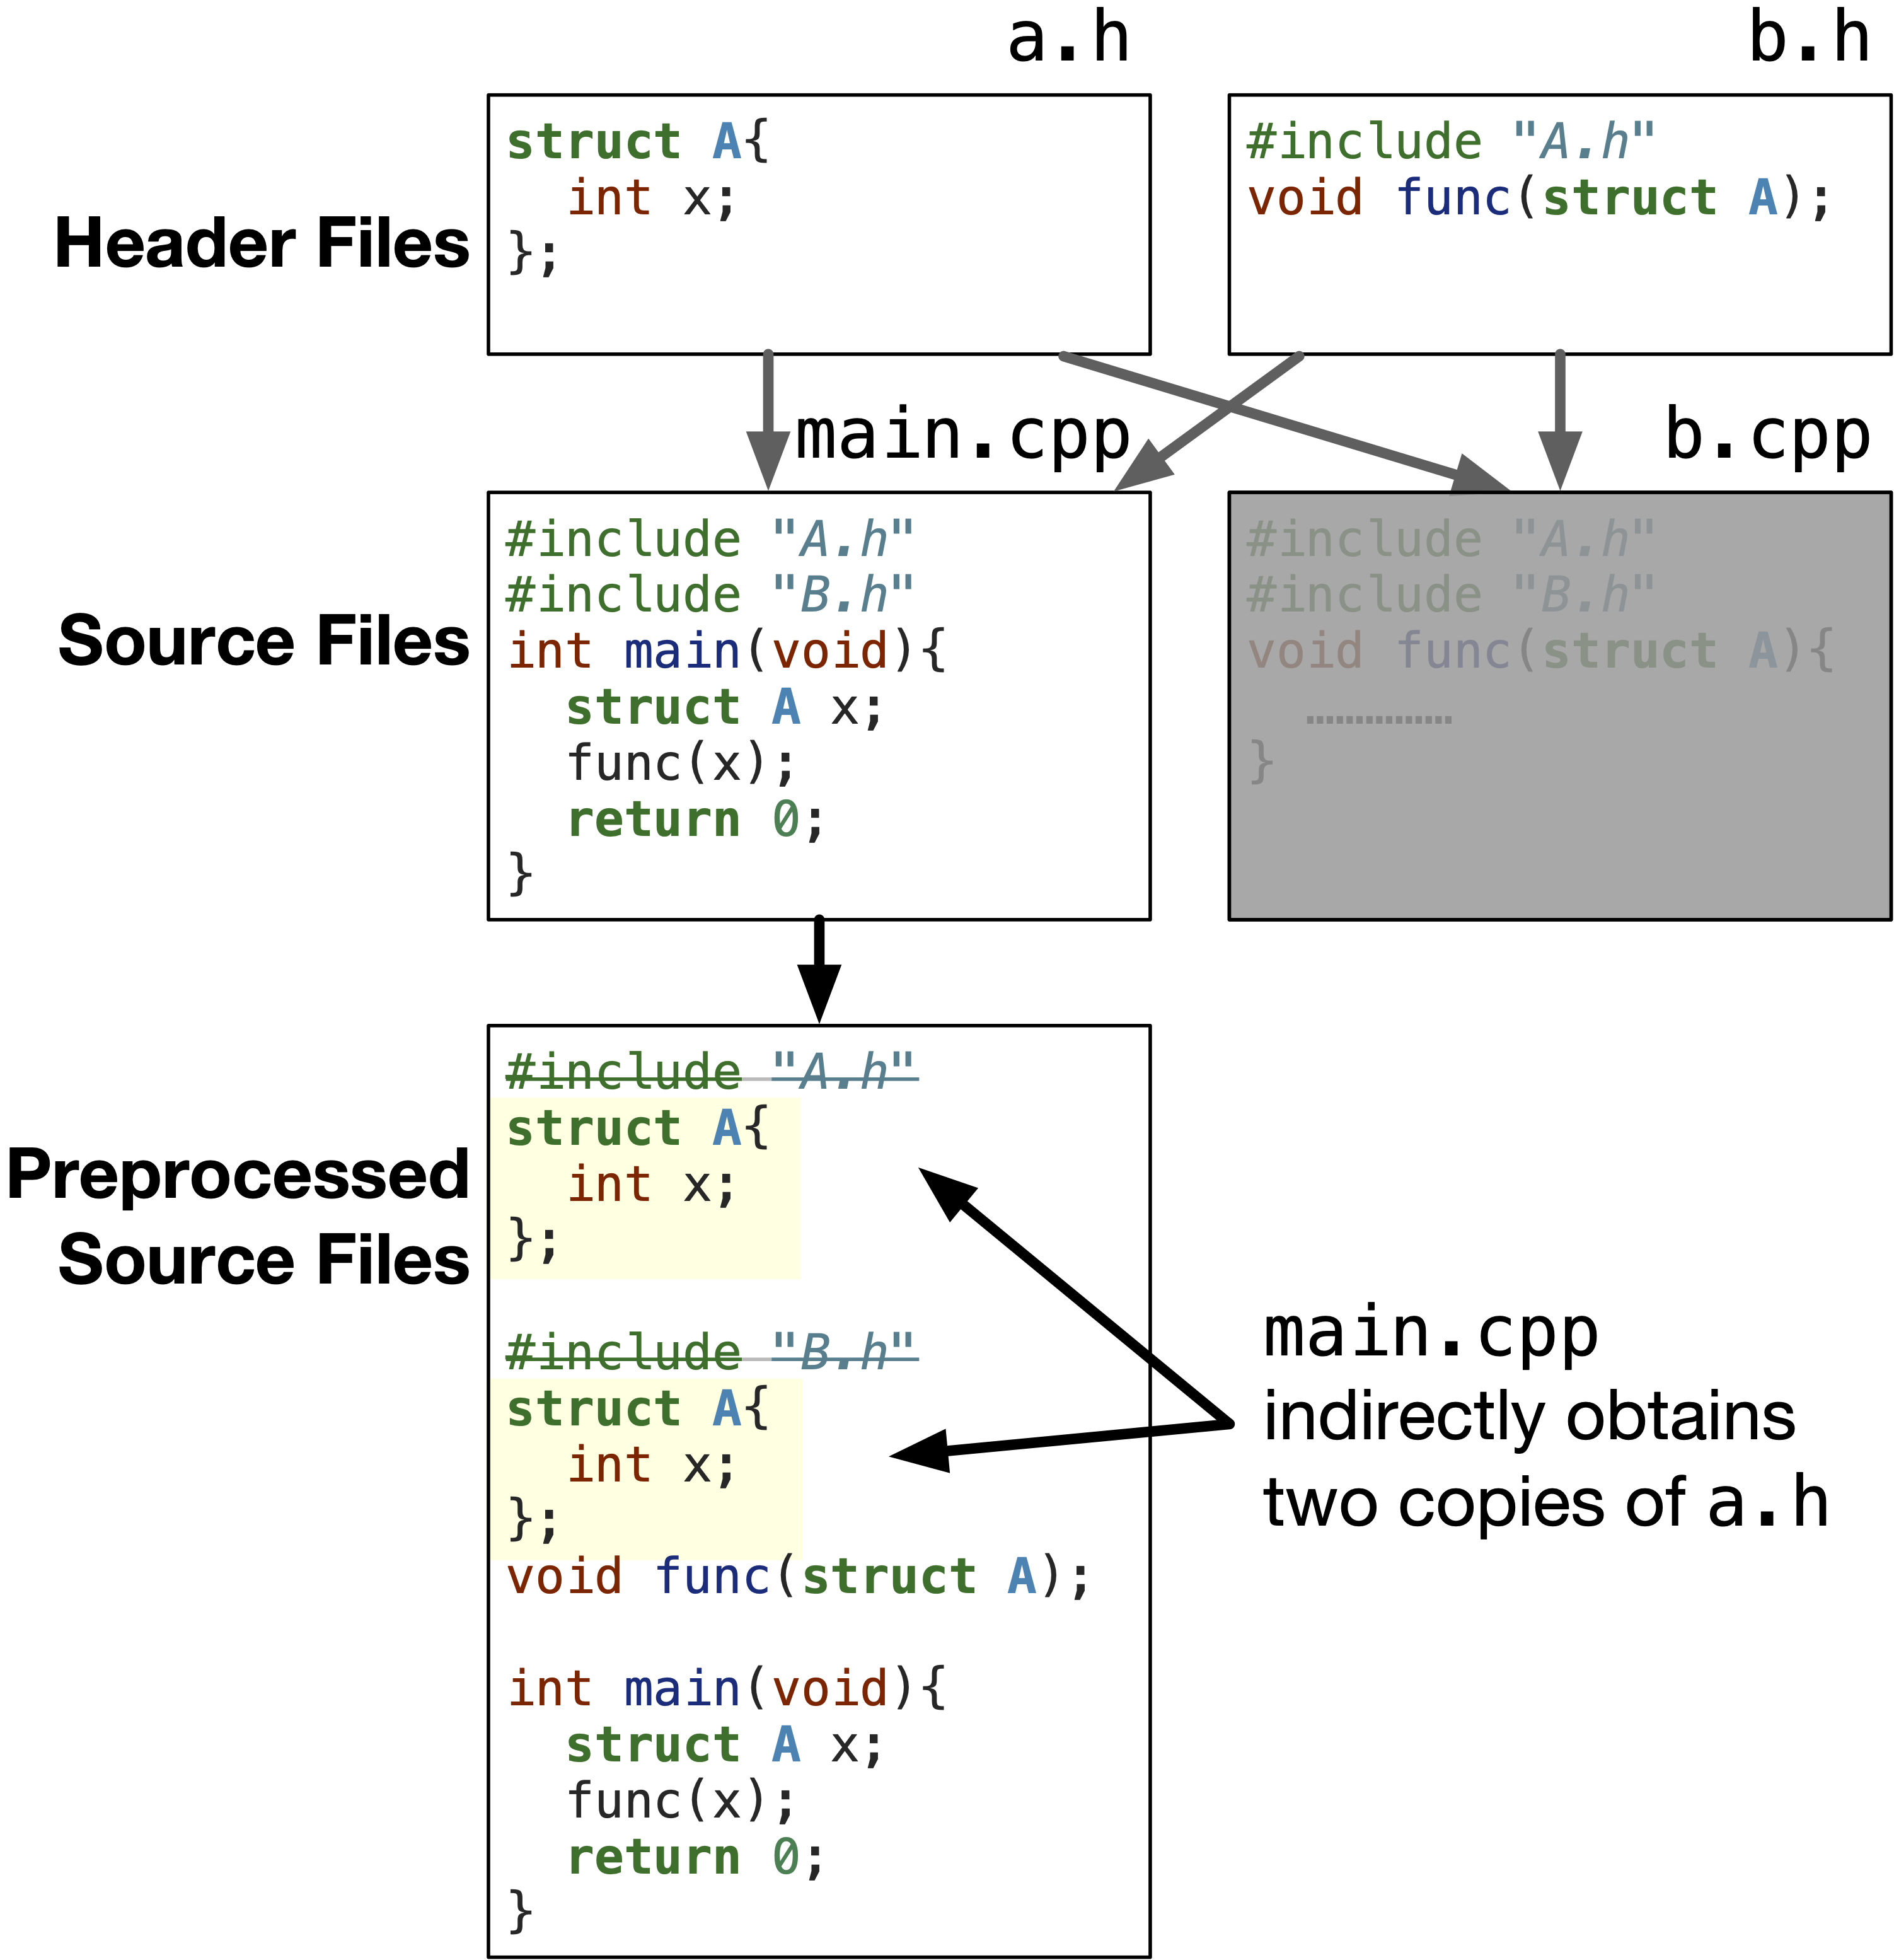
Fig. 1.16 Since a.h is included in b.h and we included a.h and b.h in main.cp, indirectly, the header file a.h is included twice in main.cpp.#
Solution! To avoid this error, we need to tell the preprocessor to include each header file only once using header guards. Header guards are preprocessor directives that prevent the contents of a header file from being included more than once in a source file. The header guards are defined at the beginning of the header file and are used to check if the header file has been included before. If the header file has been included before, the contents of the header file are not included again.
The header guards are defined as follows:
#ifndef FILE_NAME_H
#define FILE_NAME_H

// Contents of the header file

#endif
#ifndef FILE_NAME_H checks if the FILE_NAME_H macro has been defined before. If it has not been defined, the contents of the header file are included. The #define FILE_NAME_H directive defines the FILE_NAME_H macro to prevent the contents of the header file from being included again. The #endif directive ends the header guard.
For example, after adding header guards to a.h header file, it will look like the following figure. As shown, the preprocessor will include the contents of the a.h file once and define the macro A_H; however, the next time to include a.h, the preprocessor will realize that the macro A_H has been defined before and ignore the contents till #endif. In short, this will prevent the duplication of the struct A definition.
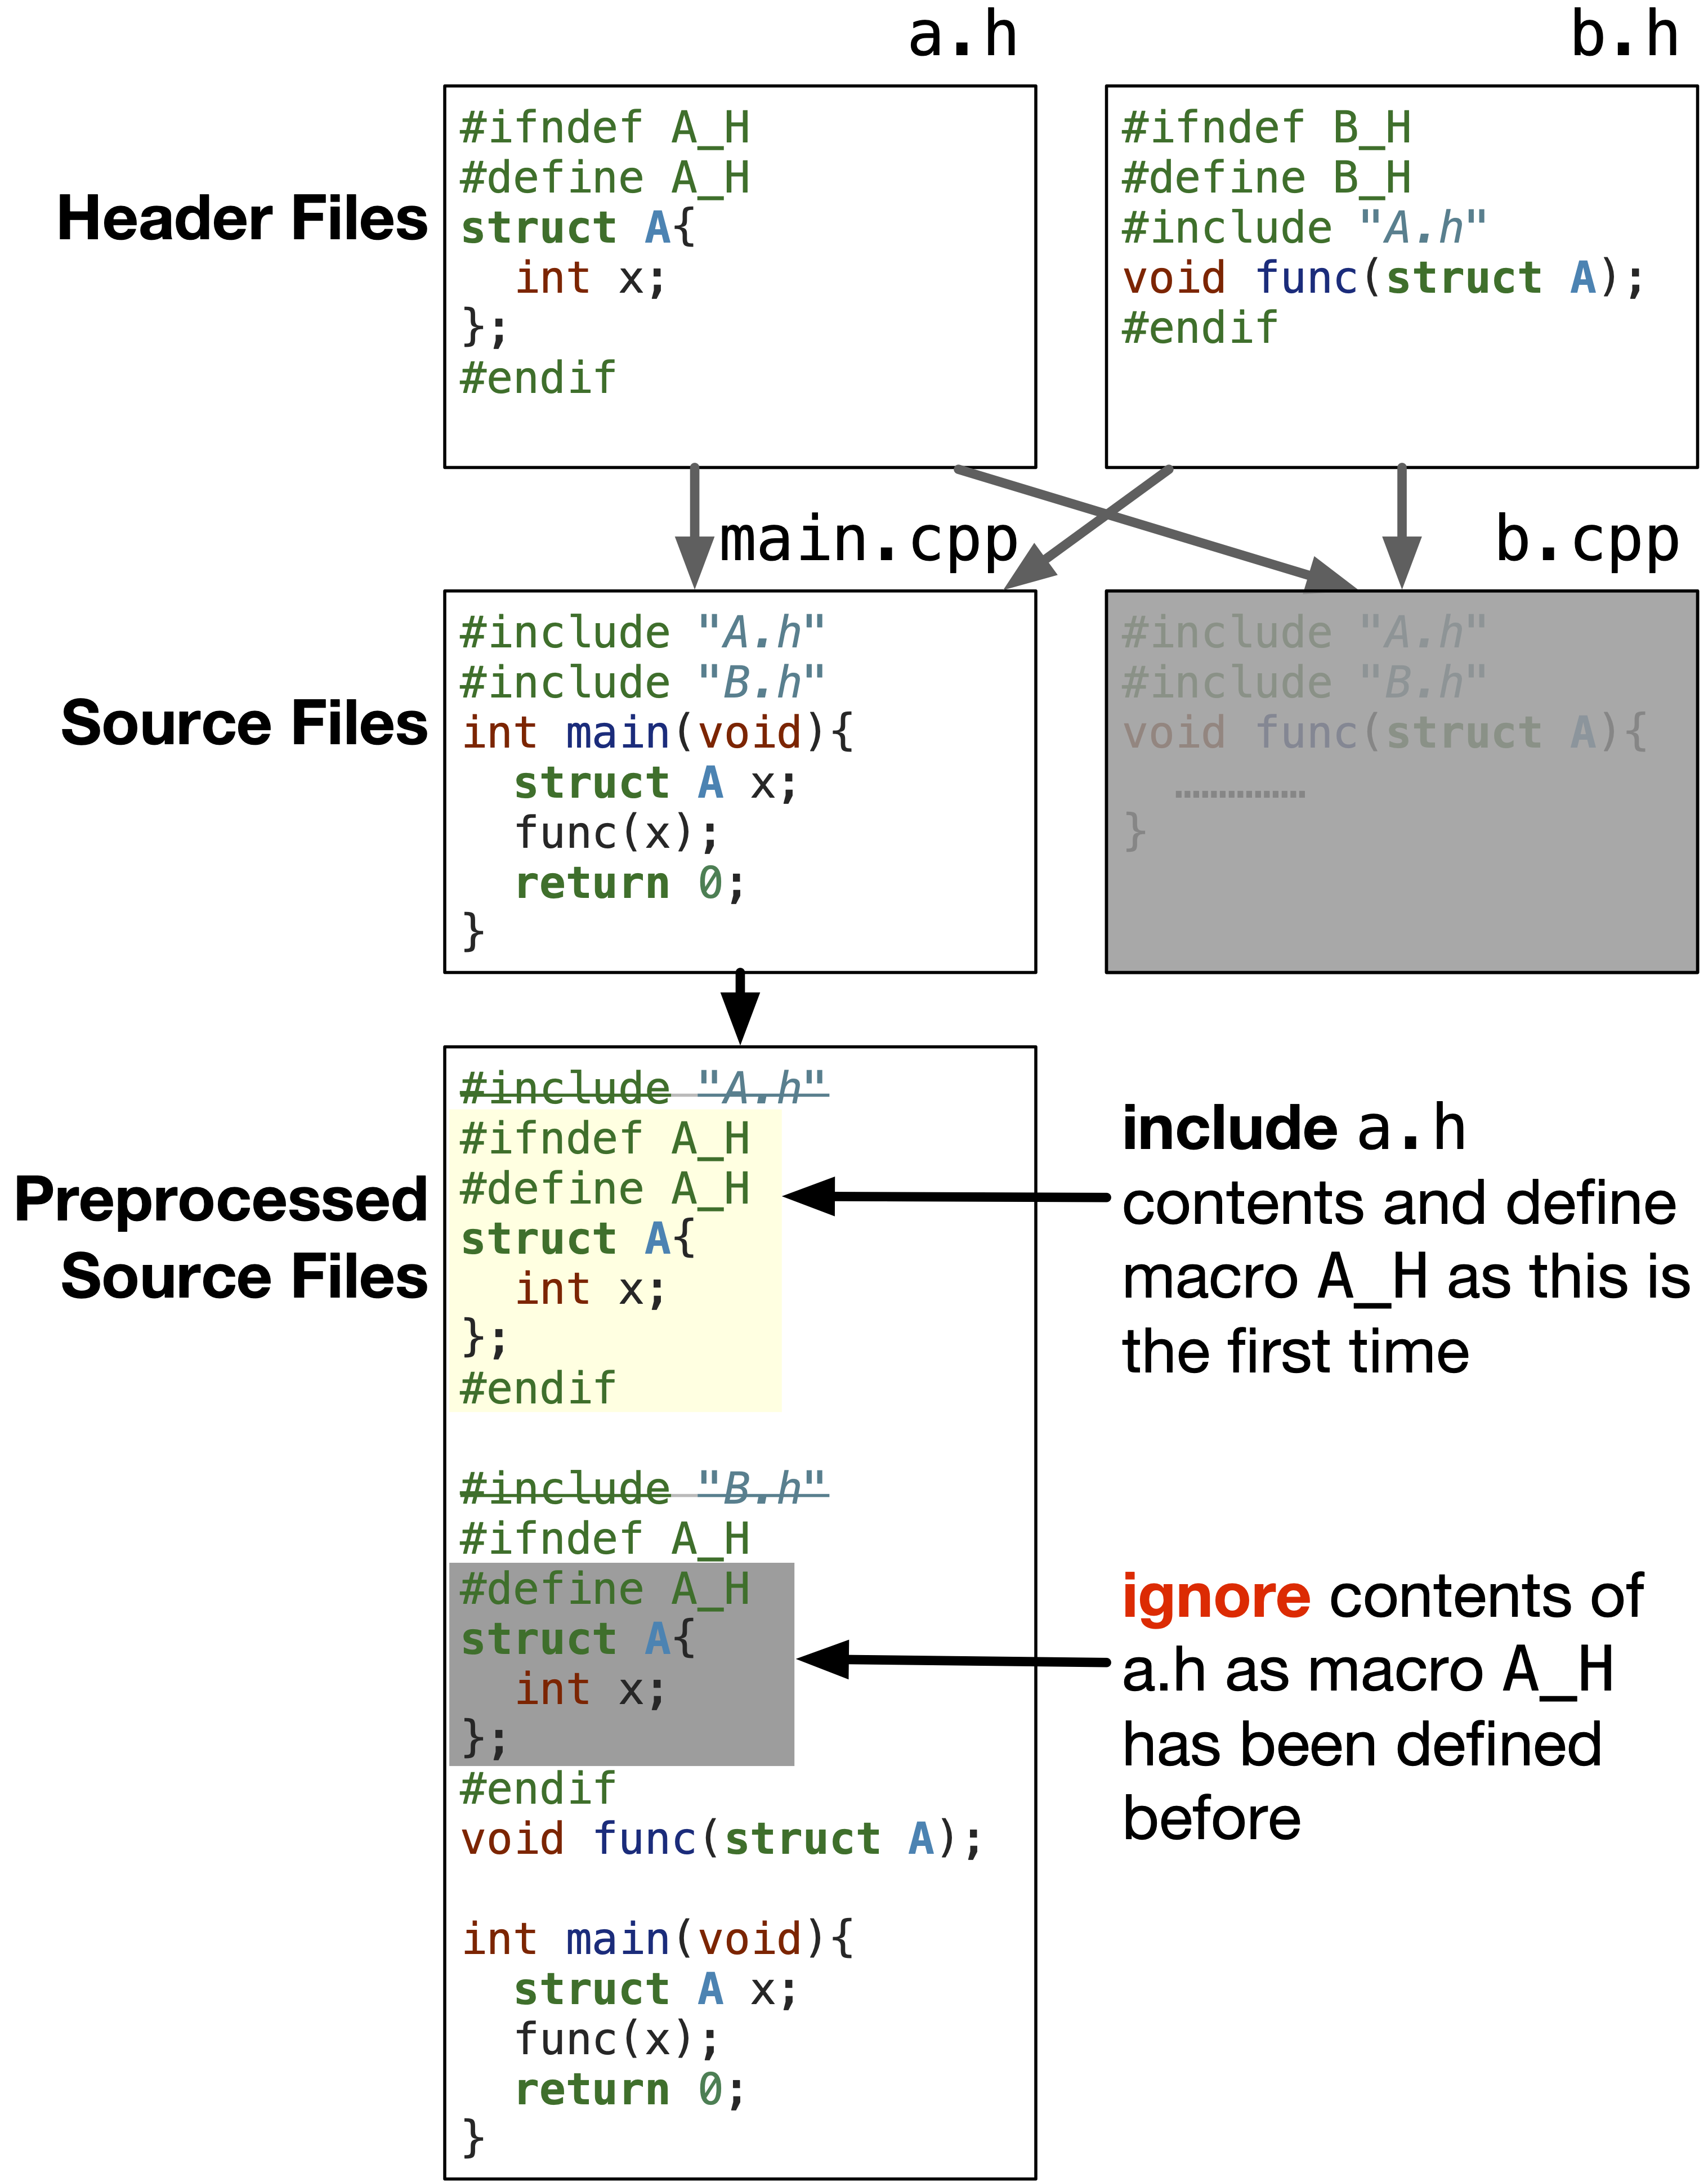
Fig. 1.17 Header guards prevent the contents of the header file from being included more than once in a source file.#
The convention in naming the macro is to follow the file name. For example, the macro in the header guards for b.h file will be B_H. This is to ensure the macros are unique and prevent conflicts with other header files.